


For today, I have prepared this article with two video tutorials and a ton of tips related to pattern adjustments. This article will help you learn how to adjust pattern for a perfect fit. We will look at how to adjust width, how to combine multiple pattern sizes and how to lengthen or shorten the pattern for different body height.
PS: When watching video tutorials, be sure to turn on captions.
1. How to choose a correct pattern size:
Select the size of the pattern based on the size chart, which utilizes body dimensions, not according to the size in which you usually buy clothes. Select the sizes of the tops (T-shirts, sweatshirts, jackets, etc.) according to the circumference of the chest (2), the size of the bottom garments (trousers, skirts, etc.) according to the circumference of the hips (4). When sewing dresses, it is necessary to take into account both the circumference of the chest and the circumference of the seat, while the circumference of the chest is more important. The waist circumference (3) is an auxiliary dimension. Children's sizes are primarily selected according to the height. The suitability of the selected size is further assessed according to the circumference of the chest or hips (depending on the type of garment).
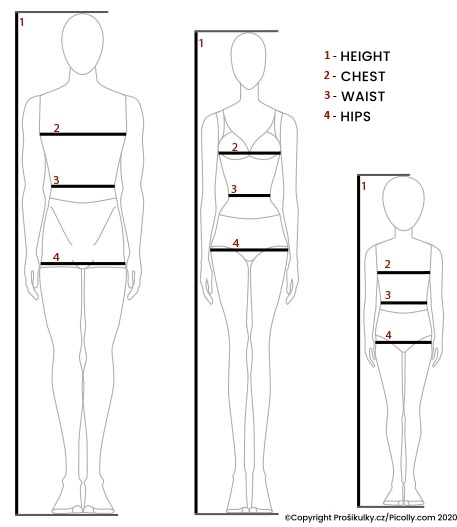
To properly measure your body dimensions, take off your clothes (you can keep your underwear on), stand upright and don't hold your breath.
2. How to scale the pattern by 1 or 2 sizes
If you do not have the pattern of your exact size and you need to make it bigger or smaller, then you can use the following technique. Although I say this several times in the video, I will repeat it here once more (just to be sure... This method should only be used to scale by one / max. two sizes. Unfortunately, it is not possible to simply make a women's pattern from a children's pattern or, conversely, to make a children's pattern from a women's pattern. This is due to the fact that different construction rules apply to different sizes and the pattern then behaves differently in different sizes. Video tutorial for scaling can be found here:
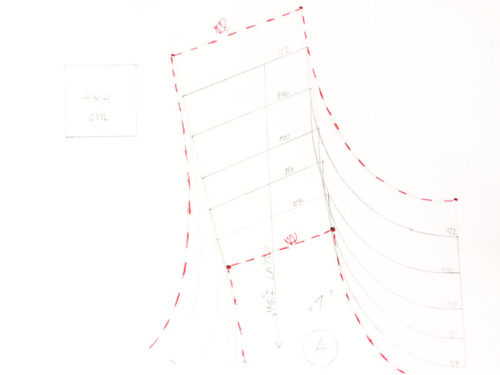
3. How to adjust the width and combine multiple sizes
The whole process of adjustments (and guide for choosing the right size) is described in detail in this video:
4. How to extend/shorten the pattern
Sewing patterns are usually designed for an average body height (168 cm for women & 180 cm for men). Start by standing next to the mirror and lightly pressing the paper pattern to your body. This is the easiest way to see where it needs to be shortened or extended. Mark these places with lines that are perpendicular to the grainline (large arrow that indicates the correct orientation of the pieces).
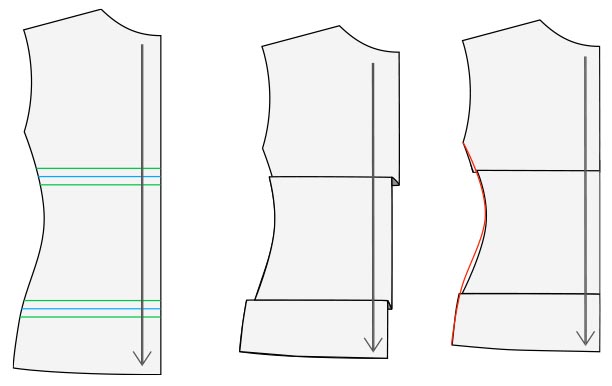
4.1 Pattern shortening - adjustments for a smaller figure
If you want to shorten the garment, draw another two lines above and below your original line. The distance between these two new lines determines how much you shorten the pattern. Fold the pattern piece so that the new lines lie on top of each other and glue the fold in this position. It is necessary to shorten the adjacent part(s) in the same way. For example, if you shortened the front piece, now shorten the back piece and vice versa. If you shorten the pattern in its top part and the adjustment affects the armholes, you will also need to adjust your sleeve pieces. Shorten the height of the sleeve head by the same amount as the front / back piece. However, this step also reduces the overall length of the sleeve. If you want the sleeve to have the original length, then you need to extend near the elbow area (by the same amount). Don't forget to draw your new side seam (and armhole) as a smooth curve.
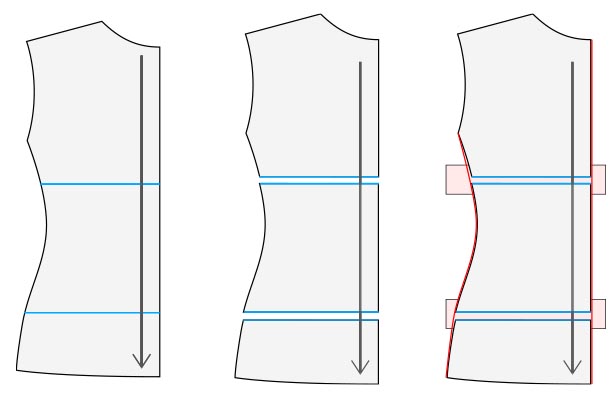
4.2 Pattern extension - adjustments for a taller figure
If you want to extend the length of the pattern, the procedure is similar. Press the paper pattern to your body and find the places where the pattern needs to be extended. Mark these places with lines that are perpendicular to the grainline. Cut the pattern along this line and move the individual parts apart by the required distance. It is important to extend the front and back pieces by the same amount (and in the same places) so that they can be connected later. Insert a strip of paper into the gap and glue both parts of the pattern to it. If the change affects the shape of the armhole, you will also need to adjust the sleeve head. Extend the sleeve head but remember that the overall length of the sleeve will increase. If necessary, shorten the total length of the sleeve in the elbow area. Don't forget to draw your new side seam (and armhole) as a smooth curve.
If you want to know how to proceed when shortening or lengthening the pants or sleeves (even with cuffs), you can watch this short video, you may find it useful:
You can always find all my video tutorials on my YouTube channel. And if you haven't subscribed to my channel yet, don't forget to click the SUBSCRIBE button below the video so that you don't miss anything in the future.
For more information on patterns, sizes, and design theory in general, see this article:
Pattern design: What’s a clothing pattern
- All articles with sewing instructions can be found here: Sewing instructions
If you are in the mood, please leave me a comment below and tell me how you liked today's article on pattern adjustments. And feel free to tell me what would you like to see in the future...
Have a nice day, Peťa