


Sewing Knitwear without an Overlock
Sewing knitwear without an overlock, using a regular sewing machine, may be a bit tricky but it doesn’t have to be a nightmare for hobby sewers. It is enough to observe 4 important steps + 1 bonus step if it’s within your capability. Let’s see the steps together.

Step 1: The Right Needle
There are countless types of needles for home sewing machines. They always vary by their use for various materials. You can find a detailed description of the types of needles in this article: Needles for a sewing machine – which to use and when.
For sewing knitwear, you’ll always use a needle designed for sewing flexible materials. In shops, you can mostly find it under the “jersey” or “ballpoint” name. In our conditions, it more or less doesn’t make a difference, which one of these two you choose.
Why use special needles? Knitwear belongs among knitted fabrics. With its specific manner of interlacing individual fibers, it allows the fabric to be elastic even without admixtures of elastane and similar materials. (You can find more information on the materials here: Woven and knitted fabrics). In order to preserve the fibers of the knitted fabric (knitwear) and thus also the flexibility of the fabric, you need to use special “round” needles (specifically jersey or ballpoint) that do not disrupt the fibers with their round tip. A frequent case when using a classic sharp needle is that the seams start “stretching” apart after several cycles of washing and wearing, unsightly holes appear around the seams, etc. This is caused precisely by disrupting the knitwear fibers during sewing.
The bottom line is to use a jersey or ball point needle for knitwear.
Step 2: A Flexible Stitch
If you sew elastic materials, you need the stitch to be flexible and not to tear up as well (especially along the perimeter – such as the bottom hem, the sleeve hem, the neck hole, etc.). Every machine is different and so is every fabric, no knitwear is the same. Therefore, there is no universal recommendation for specific machine settings, it’s always needed to try them. In any case, this step, in which you set an arbitrary flexible stitch on your machine, should precede sewing knitwear.
It can be the ordinary zigzag (I recommend rather a narrower one than a wide one, according to your taste), it can be the hemming stitch or e.g. the three-step straight stitch.
The three-step straight stitch is a stitch where the machine sews two straight stitches forward and a third stitch backward and so on – two stitches forward and one backward. It is a bit as if you imagine a hand reverse stitch, which can flex slightly thanks to the fact that the thread doesn’t just run straight forward.
It is similar with the machine three-step straight stitch. You can also use e.g. the three-step zigzag, which is done by sewing 3 stitches in one direction (e.g. forward left) and then 3 stitches to the other side (forward right). At first glance, it can look like the classic zigzag but each “zig” and “zag” consists of 3 tiny stitches. ?
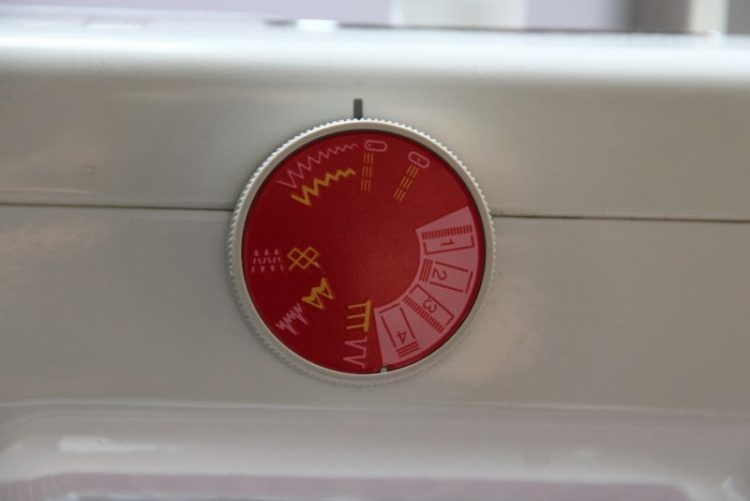
In the picture below, there is a photo of my old sewing machine with several stitches. The narrowest zigzag is selected and the three-step zigzag is marked with pink color on the far left.
Step 3: Lower Thread Tension Regulation
As you already know, you have to sew with a flexible stitch, you also have to adapt the thread tension to that. It is mostly sufficient to loosen the tension of the lower thread. Sometimes it may also be necessary to slightly loosen the tension of the upper thread. It always depends on the specific machine and material.
Why loosen the tension of the lower thread? If you choose one of the aforementioned stitches, the machine adapts the upper thread to that, it feeds it the way it needs. But it doesn’t consider what you’re sewing – that you’re sewing flexible materials and want the stitch to be elastic as well – therefore, it doesn’t modify the tension of the lower thread. You must loosen the tension of the lower thread so that even the lower thread gives you “play” in the flexibility. A flexible stitch with a tight lower thread will not be flexible, the lower thread will tear up. And you don’t want that. So, you loosen the tension of the lower thread to allow the stitch’s flexing as needed.
Step 4: Decreasing the Foot Thrust
Machines mostly have a just lower feed, which means the teeth under the stitch board feed the material below the foot but the material is not fed from the upper side in any way, which causes the foot to “shove” some materials in front of it instead of letting them behind.
With woven fabrics, this can be simply influenced by gripping both layers of the fabric with one hand before the foot and with the other hand after the foot, slightly stretching the fabric and smoothly pulling it behind the foot, helping the machine keeping both fabric layers neatly on each other without shoving. With knitwear, this is not possible because you would stretch the fabric and it would then be unsightly wavy. So, never stretch the fabric when sewing knitwear!
Therefore, it is good to decrease the foot thrust if our machine allows for that. What does it mean? The foot thrust is the “weight” of how much the foot pushes against the fabric. It is desirable that the fabric does not run anywhere under the foot but when sewing knitwear, the foot pressure on the fabric is frequently too large, causing material stretching, waving. In order to prevent that, decrease the foot thrust.
(Note: Unfortunately, some cheaper or older machines do not have the foot thrust regulation function. I recommend studying thoroughly whether your specific machine has this function and how to set it up. If you cannot regulate the foot thrust on your machine, then I recommend not underestimating the following step…)
Step 5 (Optional): Walking Foot
For most home sewing machines, it is possible to buy a so-called walking foot.
So that both fabric layers move evenly under the foot, the so-called walking foot is used, that moves the upper fabric. Therefore, the bottom feeder moves the lower fabric, the decreased thrust of the foot ensures that the fabric is not shoved in front of the foot and the walking foot feeds the upper fabric, which does not unnecessarily stretch and wrinkle and the stitch is much nicer. So, the walking foot is a useful helper that moves our entire work a bit forward…
Summary
Using these 4 (or 5) steps, you can achieve unprecedented results. You probably won’t manage to sew according to your wish the first time, quite possibly even the second time. But keep trying. You should always test all machine settings on a
cut-off of the fabric you want to use for sewing, in order to verify the behavior of precisely this machine setting with your specific material.
Don’t forget that there’s no shame in not knowing. Sewing knitwear (and not only that) is about practice and it takes multiple attempts and getting the hang of it.
And don’t forget the most important thing: you have to sew with love. The machine can tell the difference… ?
Have a good time, Peťa