


After reading the title of this article, you probably wonder what I could have written about such a simple thing, but you may be surprised, sewing buttons has its “rules”.
Buttons have different purposes, they are made of different materials, they have different styles of attachment, but today we will mainly look at flat or sew-through buttons.
Sew-through buttons most often have two or four holes. Of course, you can come across buttons with non-traditional numbers of holes (for example with three, six, or even twelve holes). These buttons will allow you to add another fun twist to your project, but today we are more concerned with the practical side of things.
1 - Single-threaded needle
In almost all cases, I recommend sewing a button with a single-threaded needle. When sewing with a double-threaded needle, you can easily overlook slacks, loops, and knots that may form on one of the threads. If you do not notice such errors immediately, it can be very difficult or impossible to fix them without having to remove the button.
(I know many people recommend the opposite - using a double-threaded needle - but a single-threaded needle has worked better for me. So, you know... Maybe try both ways and see which suits you better. :) )
2 - Auxiliary pin
Before sewing, put a pin or needle between the button and the fabric to create a little space between the two. This is called "creating a shank". It will prevent you from sewing the button too tightly. Otherwise, the fabric may start to curl or you may not be able to push the button through the buttonhole later. You can also use a toothpick to create a shank.
3 - Firm, but not too firm
“Firm” does not mean that you should make twenty rock-solid stitches! The number (and tightness) of stitches depends on the size and weight of the button and also on the fabric.
4 - Strengthen the shank
The button will feel loose after you pull out the spacer, so you have to strengthen its shank a bit - wrap the thread around the threads that connect the button to the fabric a few times. Then pierce the fabric one last time, make a few stitches underneath the button and tie the thread off.
Some basic "rules":
YOU MUSTN'T TREAT THIS AS GOSPEL - ALWAYS ADAPT YOUR TECHNIQUE TO THE FABRIC AND THE SPECIFIC PIECE. IT IS IMPORTANT TO TRY NEW THINGS AND HAVE FUN :)
Shirts - single-threaded needle, no shank.
Pants - single-threaded needle + shank.
Coats - double-threaded needle + shank.
5 - Knots
Use two knots to tie the thread off. It should be enough and a large "lump" of knots is not necessarily more secure - it is easy to tear off by accident.
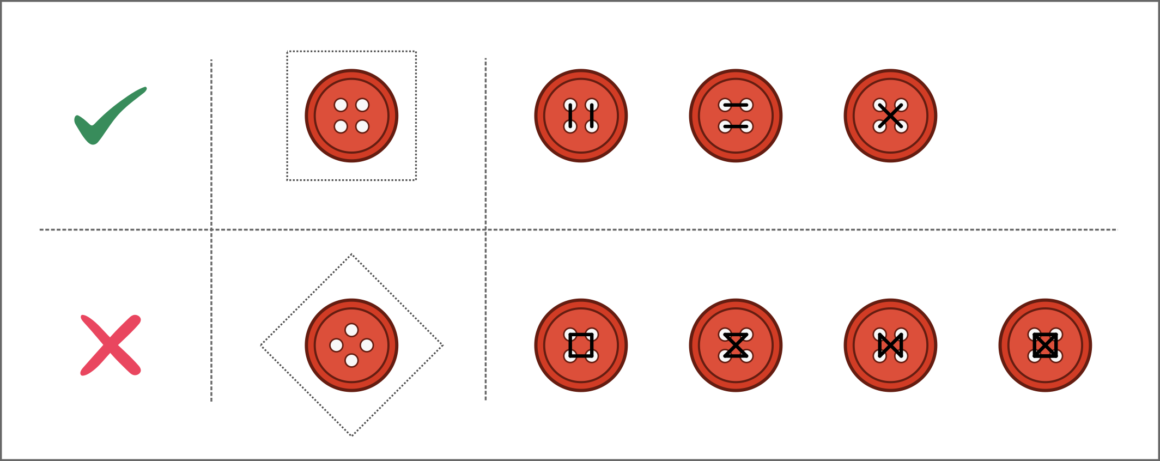
6 - Crosses and parallel lines
When sewing a four-hole button, you should choose whether you want to sew it with threads that cross in the middle of the button or with two parallel lines of threads - I do not recommend combining these two methods on one button. The lines on a cross-stitched button should be diagonal (“X”), not horizontal & vertical (“+”).
To ensure this, place the button so that there are two holes at the top (side of a square), not one (corner of a square).
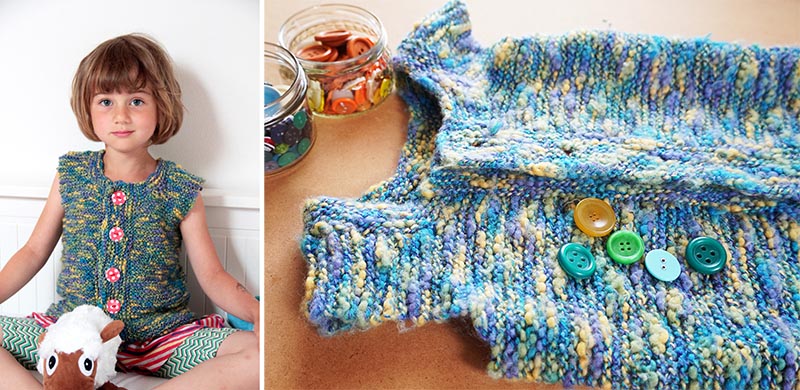
8 - Unified style
If you have a piece with more buttons, it usually looks better if you sew them all in the same way.
Although I can imagine a design that would intentionally use several types of buttons and several attachment styles. I got into such a situation when I modified this vest, which I originally knitted for Terulka. But when Terulka grew out of it and Tomík wanted to wear it, I decided to switch the pink buttons for different ones, but because I couldn't find enough of the same buttons at home, I just used the ones I had. :)
9 - Elegance
If you sew formal wear, I recommend using 4-hole buttons, as they look a bit more elegant. And it is ideal to sew them with two parallel & horizontal lines of threads.
10 - Big buttons
If you are sewing a larger button (or using a thicker fabric), don’t make more stitches when you feel that your thread may not hold the button well. It is better to just choose a more suitable thread. You can use embroidery thread, special thread for sewing buttons/buttonholes, strong topstitching thread, etc. If you sew a button on a knitted/crocheted piece, you should use the knitting yarn from which the piece is made. If this is not possible (due to the size of the holes on the button), choose a different yarn.
11 - Thread color
On formal wear, the buttons are usually sewn with thread that matches the color of the specific garment. However, you can use a thread of a different color to create a nice contrast.
12 - Button as a decorative element
Remember that the button can also be an accessory. So before you throw away that old box full of spare buttons that your grandma saved, see if there are any treasures in it.
Thank you for your support and have a nice day!
Petra
Don't forget to share your joy with others!
Do you like this article? If so, share it with your friends and tell me about it in the comments section below. I will be glad for any feedback! ♥
PS: Did you know that there are FREE PATTERNS available on my blog?