


The size charts are just charts showing average values that correspond to sizes of ready-made clothes.
Please do not be fooled by the fact that you are used to buying clothes in a certain size, and according to the size charts below, you should choose pattern of a completely different size. This is very common, and it doesn’t actually mean anything. It's just a consequence of the fact that every pattern/clothing designer, every manufacturer and every seller have their own size chart.
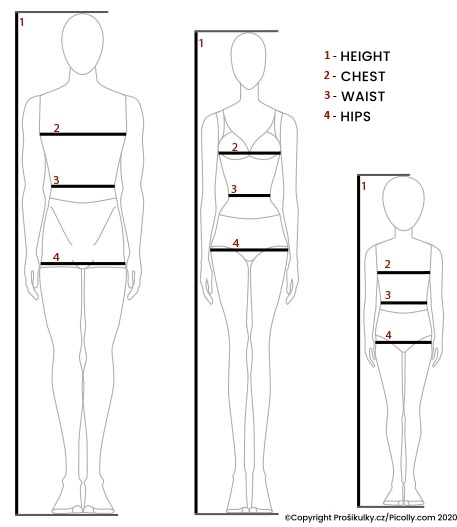
If you want to sew clothes that fit you really well, you first need to measure yourself correctly. If you want to measure yourself, ask someone to assist you - you should stand in a natural upright position when taking the measurements, which is almost impossible to do when you are twisting around with a measuring tape in hand.
Please also note that even if we have two persons whose measurements (height, chest, waist, hips) are the same, they will differ in other ways. One of them may have wider back and smaller bust, the other may be more less muscular with a bigger bust.
It can also happen (and very often it does) that according to the circumference of the chest you should choose one size of the pattern and according to the circumference of the waist you should choose a different one. For tops (dresses, T-shirts, sweatshirts, jackets, etc.) you should base your choice of size on the circumference of your chest. When choosing the size of pants and skirts, the most important body dimension is the circumference of the hips. Select the appropriate size according to this value and then adjust the pattern as needed. You can find out more about pattern adjustments at the bottom of this article.
To get the best out of your projects, I highly recommend reading all the recommendations below the size charts.
Women’s sizes
Metric (cm)
This chart was compiled for a woman of average height (168 cm).

Imperial (in)
This chart was compiled for a woman of average height (5′ 6″).

Children’s sizes - CLASSIC
Metric (cm)

Imperial (in)

Children’s sizes - SLIM
Metric (cm)

Imperial (in)

Men’s sizes
Metric (cm)
This chart was compiled for a man of average height (180 cm).

Imperial (in)
This chart was compiled for a man of average height (6′).

For best results, please read the following lines:
- My patterns are constructed in ready-made sizes, because it is impossible to construct a pattern variation for every body type (the size chart would contain hundreds of “sizes” and no one would really be able to make sense of it).
- To make the clothes fit specific figure perfectly, you need to carefully measure it first. Then compare measurements with size chart and paper pattern. This is the only way to find the right size.
- In addition, it’s almost always necessary to adjust the pattern slightly to make it fit perfectly. (Even if we have two women whose measurements are the same, they will differ in other ways - one of them may have a narrower back and a larger bust, the other may be more muscular with smaller bust. One of them may also have wider hips and flatter buttocks, the other may have narrower hips and rounder buttocks...) Patterns (and their sizes) are only rough guidelines. If you are going for perfect fit, you need to perform fitting tests and adjust the garments accordingly. Sewing is a creative activity and you need to take into account that each of us is built differently. THIS APPLIES TO CHILDREN'S AND MEN'S CLOTHES TOO - WE ARE ALL UNIQUE.
- If you are using some pattern for the first time, always sew “test piece” from a cheaper (but similar) fabric first. Mark any adjustments in the paper pattern and then use it to sew the final product. It is a classic tailoring method. No two fabrics are the same, therefore, please note that what works with one fabric may not work with another. That is why you should always sew test samples. Sewing is not like baking, you can’t just pick the pattern and expect the perfect results without some measuring, testing and adjusting. That's just how it works.
- I also recommend basting (temporarily stitching) all seams that affect circumferences (such as side seams, instep seams, etc.) before sewing. So, you can try the garment on and adjust it if necessary. Do not underestimate ironing and testing the clothes during the sewing process.
- Also don’t forget to carefully mark all seam allowances. A common beginner mistake is to just “eyeball it”. It is necessary to measure seam allowances with the measuring tape around the entire pattern and then sew along the correct seamlines - seam allowances width away from the cutting edges. Careless work with the seam allowances can result in large deviations in the overall widths and lengths of the individual pieces.
- When laying out the pattern (positioning the paper pattern pieces on the fabric) always make sure that the pieces are oriented correctly.
- You can learn more about pattern adjustments here:
I hope all this information will help you sew beautiful pieces.
All sewing instructions, tutorials & tips can be found here: Sewing instructions
How to scale a pattern
Can’t find your size in the size chart? Watch this video about how to scale a pattern up or down:
PS:Don't forget to turn on captions.
How to adjust a pattern for a perfect fit
Watch this video to learn how to adjust your pattern for a perfect fit.
PS:Don't forget to turn on captions.
Have a nice day, Peťa
PS: Did you know there are free patterns available on my blog? You can find them here: